

Creating and connecting to a MySQL DB instance
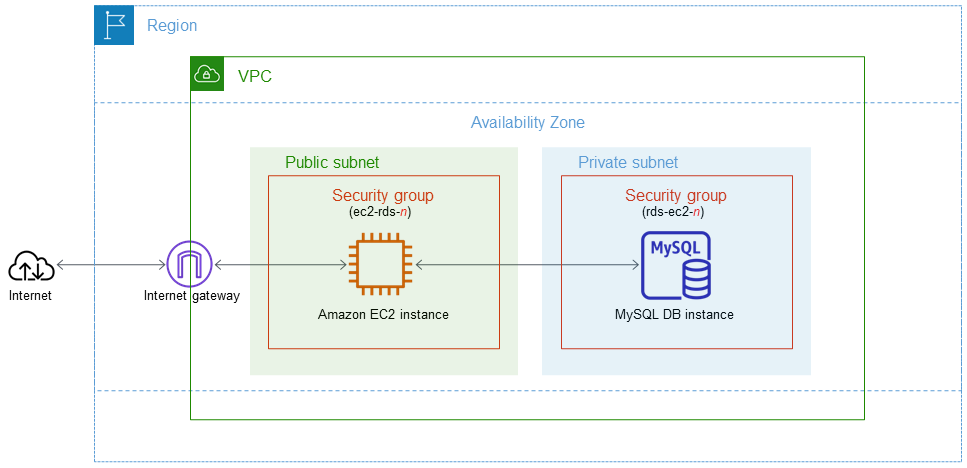
This article to creates an EC2 instance and an RDS for MySQL DB instance. The tutorial shows you how to access the DB instance from the EC2 instance using a standard MySQL client. As a best practice, this tutorial creates a private DB instance in a virtual private cloud (VPC). In most cases, other resources in the same VPC, such as EC2 instances, can access the DB instance, but resources outside of the VPC can't access it.
Important
There's no charge for creating an AWS account. However, by completing this tutorial, you might incur costs for the AWS resources you use. You can delete these resources after you complete the tutorial if they are no longer needed.
The following diagram shows the configuration when the tutorial is complete.
This tutorial uses Easy create to create a DB instance running MySQL with the AWS Management Console. With Easy create, you specify only the DB engine type, DB instance size, and DB instance identifier. Easy create uses the default settings for the other configuration options. The DB instance created by Easy create is private.
When you use Standard create instead of Easy create, you can specify more configuration options when you create a DB instance, including ones for availability, security, backups, and maintenance. To create a public DB instance, you must use Standard create. For information about creating DB instances with Standard create, see Creating an Amazon RDS DB instance.
Topics
Prerequisites
Before you begin, complete the steps in the following sections:
Step 1: Create a MySQL DB instance
The basic building block of Amazon RDS is the DB instance. This environment is where you run your MySQL databases.
In this example, you use Easy create to create a DB instance running the MySQL database engine with a db.t3.micro DB instance class.
To create a MySQL DB instance with Easy create
Sign in to the AWS Management Console and open the Amazon RDS console at https://console.aws.amazon.com/rds/.
In the upper-right corner of the Amazon RDS console, choose the AWS Region in which you want to create the DB instance.
In the navigation pane, choose Databases.
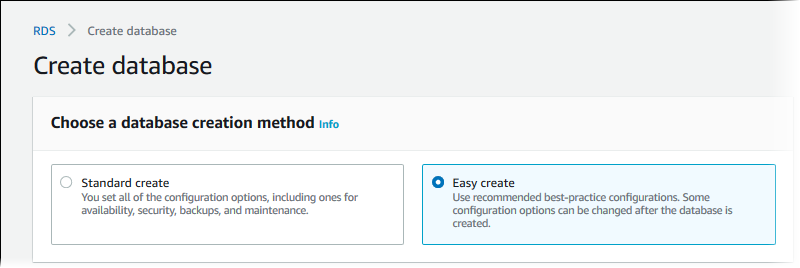
Choose Create database and make sure that Easy create is chosen.
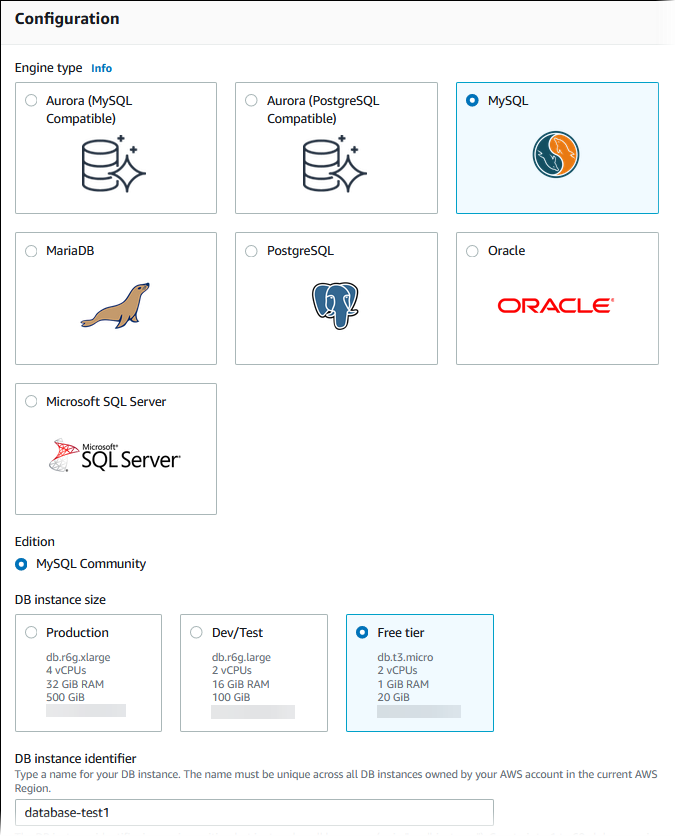
In Configuration, choose MySQL.
For DB instance size, choose Free tier.
For DB instance identifier, enter
database-test1.For Master username, enter a name for the master user, or keep the default name.
The Create database page should look similar to the following image.
To use an automatically generated master password for the DB instance, select Auto generate a password.
To enter your master password, make sure Auto generate a password is cleared, and then enter the same password in Master password and Confirm password.
Open View default settings for Easy create.
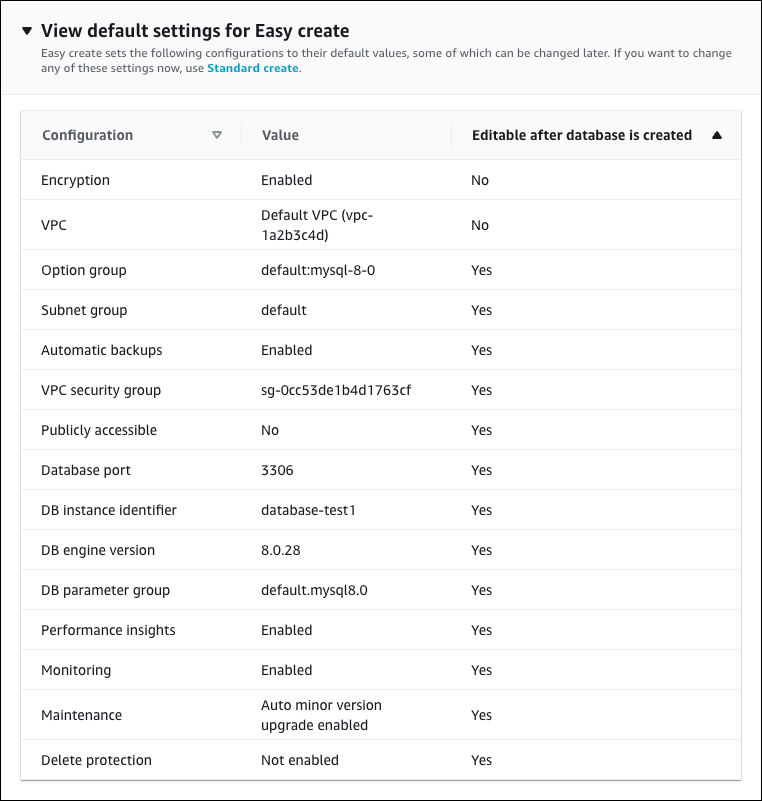
Note the setting for VPC. Your DB instance and EC2 instance must reside in the same VPC to set up connectivity between them automatically in a later step. If you didn't create a new VPC in the AWS Region, then the default VPC is selected.
You can examine the default settings used with Easy create. The Editable after database is created column shows which options you can change after you create the database.
If a setting has No in that column, and you want a different setting, you can use Standard create to create the DB instance.
If a setting has Yes in that column, and you want a different setting, you can either use Standard create to create the DB instance, or modify the DB instance after you create it to change the setting.
Choose Create database.
To view the master username and password for the DB instance, choose View credential details.
You can use the username and password that appears to connect to the DB instance as the master user.
Important
You can't view the master user password again. If you don't record it, you might have to change it.
If you need to change the master user password after the DB instance is available, you can modify the DB instance to do so. For more information about modifying a DB instance, see Modifying an Amazon RDS DB instance.
In the Databases list, choose the name of the new MySQL DB instance to show its details.
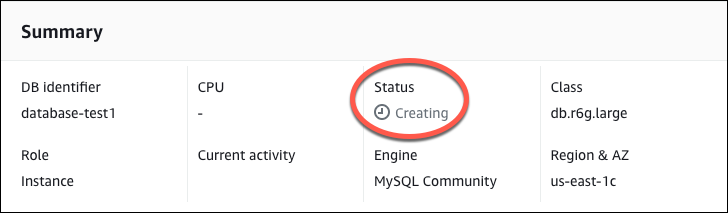
The DB instance has a status of Creating until it is ready to use.
Wait for the Region & AZ value to appear. When it appears, make a note of the value because you need it later. In the following image, the Region & AZ value is us-east-1c.
When the status changes to Available, you can connect to the DB instance. Depending on the DB instance class and the amount of storage, it can take up to 20 minutes before the new instance is available. While the DB instance is being created, you can move on to the next step and create an EC2 instance.
Step 2: Create an EC2 instance
Create an Amazon EC2 instance that you will use to connect to your database.
To create an EC2 instance
Sign in to the AWS Management Console and open the Amazon EC2 console at https://console.aws.amazon.com/ec2/.
In the upper-right corner of the AWS Management Console, choose the AWS Region you used for the database previously.
Choose EC2 Dashboard, and then choose Launch instance, as shown in the following image.

The Launch an instance page opens.
Choose the following settings on the Launch an instance page.
Under Name and tags, for Name, enter
ec2-database-connect.Under Application and OS Images (Amazon Machine Image), choose Amazon Linux, and then choose the Amazon Linux 2 AMI. Keep the default selections for the other choices.

Under Instance type, choose t2.micro.
Under Key pair (login), choose a Key pair name to use an existing key pair. To create a new key pair for the Amazon EC2 instance, choose Create new key pair and then use the Create key pair window to create it.
For more information about creating a new key pair, see Create a key pair in the Amazon EC2 User Guide for Linux Instances.
In Network settings, choose Edit.
For VPC, choose the VPC that you used for the database. If you didn't create a new VPC in the AWS Region, choose the default VPC.
For Subnet, choose the subnet that is in the same Availability Zone as the database. You noted the Availability Zone of the database when you created it previously. If you don't know the Availability Zone of the database, you can find it in the database details.
For Auto-assign public IP, make sure Enable is selected.
If this setting has changed to Disable, then there is more than one subnet in the Availability Zone, and Subnet is set to a private subnet. In this case, change the Subnet setting to a public subnet in the Availability Zone.
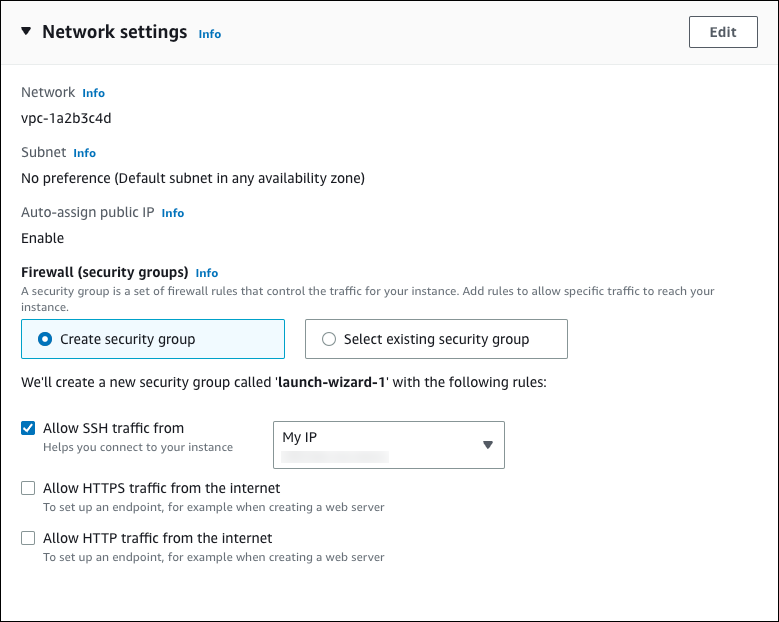
For Firewall (security groups), keep the default values.
For Inbound security groups rules, choose the source of SSH connections to the EC2 instance.
For Type, choose ssh.
For Source type, choose My IP if the displayed IP address is correct for SSH connections.
Otherwise, choose Custom and specify the IP address or IP address range. To determine your public IP address, open a different browser window or tab, and use the service at https://checkip.amazonaws.com. An example of an IP address is
192.0.2.1/32.In many cases, you might connect through an internet service provider (ISP) or from behind your firewall without a static IP address. If so, make sure to determine the range of IP addresses used by client computers.
Warning
If you use
0.0.0.0/0for SSH access, you make it possible for all IP addresses to access your public EC2 instances using SSH. This approach is acceptable for a short time in a test environment, but it's unsafe for production environments. In production, authorize only a specific IP address or range of addresses to access your EC2 instances using SSH.The following image shows an example of the Inbound security groups rules section.
Leave the default values for the remaining sections.
Review a summary of your EC2 instance configuration in the Summary panel, and when you're ready, choose Launch instance.
On the Launch Status page, note the identifier for your new EC2 instance, for example:
i-1234567890abcdef0.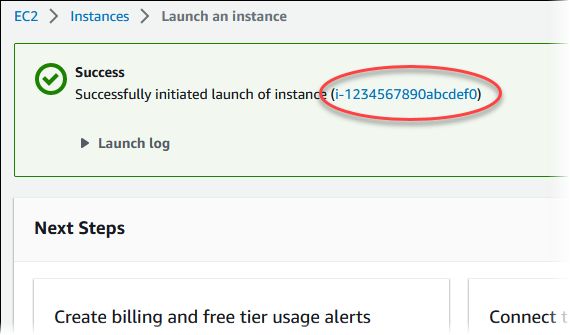
Choose the EC2 instance identifier to open the list of EC2 instances, and then select your EC2 instance.
In the Details tab, note the following values, which you need when you connect using SSH:
In Instance summary, note the value for Public IPv4 DNS.

In Instance details, note the value for Key pair name.

Wait until the Instance state for your EC2 instance has a status of Running before continuing.
Step 3: Connect your EC2 instance and MySQL DB instance automatically
You can automatically connect an existing EC2 instance to a DB instance using the RDS console. The RDS console simplifies setting up the connection between an EC2 instance and your MySQL DB instance. For this tutorial, set up a connection between the EC2 instance and the MySQL DB instance that you created previously.
Before setting up a connection between an EC2 instance and an RDS database, make sure you meet the requirements described in Overview of automatic connectivity with an EC2 instance.
If you make changes to security groups after you configure connectivity, the changes might affect the connection between the EC2 instance and the RDS database.
Note
You can only set up a connection between an EC2 instance and an RDS database automatically by using the AWS Management Console. You can't set up a connection automatically with the AWS CLI or RDS API.
To connect an EC2 instance and an RDS database automatically
Sign in to the AWS Management Console and open the Amazon RDS console at https://console.aws.amazon.com/rds/.
In the navigation pane, choose Databases, and then choose the RDS database.
For Actions, choose Set up EC2 connection.
The Set up EC2 connection page appears.
On the Set up EC2 connection page, choose the EC2 instance.
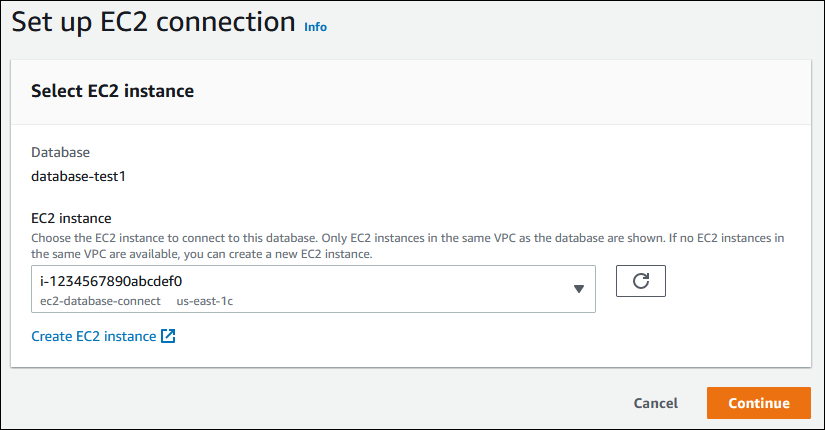
If no EC2 instances exist in the same VPC, choose Create EC2 instance to create one. In this case, make sure the new EC2 instance is in the same VPC as the RDS database.
Choose Continue.
The Review and confirm page appears.
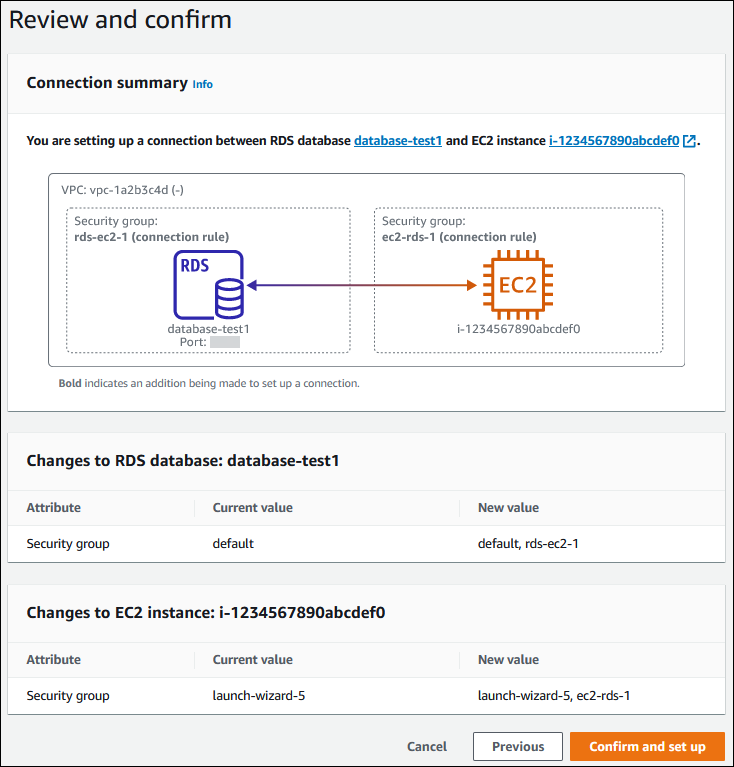
On the Review and confirm page, review the changes that RDS will make to set up connectivity with the EC2 instance.
If the changes are correct, choose Confirm and set up.
If the changes aren't correct, choose Previous or Cancel.
To set up connectivity, RDS adds a security group to the EC2 instance and a security group to the DB instance.
Step 4: Connect to a MySQL DB instance
You can use any standard SQL client application to connect to the DB instance. In this example, you connect to a MySQL DB instance using the mysql command-line client.
To connect to a MySQL DB instance
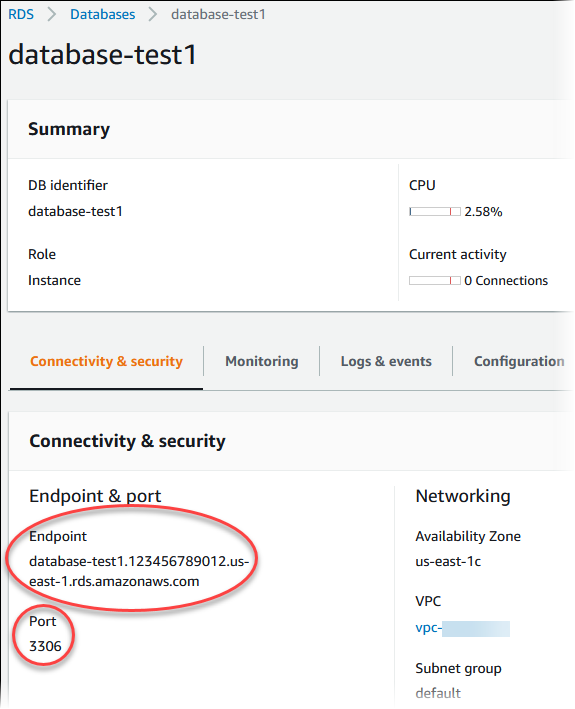
Find the endpoint (DNS name) and port number for your DB instance.
Sign in to the AWS Management Console and open the Amazon RDS console at https://console.aws.amazon.com/rds/.
In the upper-right corner of the Amazon RDS console, choose the AWS Region for the DB instance.
In the navigation pane, choose Databases.
Choose the MySQL DB instance name to display its details.
On the Connectivity & security tab, copy the endpoint. Also, note the port number. You need both the endpoint and the port number to connect to the DB instance.
Connect to the EC2 instance that you created earlier by following the steps in Connect to your Linux instance in the Amazon EC2 User Guide for Linux Instances.
We recommend that you connect to your EC2 instance using SSH. If the SSH client utility is installed on Windows, Linux, or Mac, you can connect to the instance using the following command format:
ssh -i location_of_pem_file ec2-user@ec2-instance-public-dns-nameFor example, assume that
ec2-database-connect-key-pair.pemis stored in/dir1on Linux, and the public IPv4 DNS for your EC2 instance isec2-12-345-678-90.compute-1.amazonaws.com. Your SSH command would look as follows:ssh -i /dir1/ec2-database-connect-key-pair.pem ec2-user@ec2-12-345-678-90.compute-1.amazonaws.comGet the latest bug fixes and security updates by updating the software on your EC2 instance. To do this, use the following command.
Note
The
-yoption installs the updates without asking for confirmation. To examine updates before installing, omit this option.sudo yum update -yInstall the mysql command-line client from MariaDB.
Most Linux distributions, including Amazon Linux 2, include the mysql command-line client from MariaDB instead of the mysql command-line client from Oracle. To install the mysql command-line client from MariaDB on Amazon Linux 2, run the following command:
sudo yum install mariadbConnect to the MySQL DB instance. For example, enter the following command. This action lets you connect to the MySQL DB instance using the MySQL client.
Substitute the DB instance endpoint (DNS name) for
endpoint, and substitute the master username that you used foradmin. Provide the master password that you used when prompted for a password.mysql -h endpoint -P 3306 -u admin -pAfter you enter the password for the user, you should see output similar to the following.
 Welcome to the MariaDB monitor.  Commands end with ; or \g.
 Your MySQL connection id is 3082
 Server version: 8.0.28 Source distribution

 Copyright (c) 2000, 2018, Oracle, MariaDB Corporation Ab and others.

 Type 'help;' or '\h' for help. Type '\c' to clear the current input statement.

 MySQL [(none)]>
For more information about connecting to a MySQL DB instance, see Connecting to a DB instance running the MySQL database engine. If you can't connect to your DB instance, see Can't connect to Amazon RDS DB instance.
For security, it is a best practice to use encrypted connections. Only use an unencrypted MySQL connection when the client and server are in the same VPC and the network is trusted. For information about using encrypted connections, see Connecting from the MySQL command-line client with SSL/TLS (encrypted).
Run SQL commands.
For example, the following SQL command shows the current date and time:
SELECT CURRENT_TIMESTAMP;
Step 5: Delete the EC2 instance and DB instance
After you connect to and explore the sample EC2 instance and DB instance that you created, delete them so you're no longer charged for them.
To delete the EC2 instance
Sign in to the AWS Management Console and open the Amazon EC2 console at https://console.aws.amazon.com/ec2/.
In the navigation pane, choose Instances.
Select the EC2 instance, and choose Instance state, Terminate instance.
Choose Terminate when prompted for confirmation.
For more information about deleting an EC2 instance, see Terminate your instance in the Amazon EC2 User Guide for Linux Instances.
To delete the DB instance with no final DB snapshot
Sign in to the AWS Management Console and open the Amazon RDS console at https://console.aws.amazon.com/rds/.
In the navigation pane, choose Databases.
Choose the DB instance that you want to delete.
For Actions, choose Delete.
Clear Create final snapshot? and Retain automated backups.
Complete the acknowledgement and choose Delete.